I don't think anyone needs to host other people's spam on the web. If they want to post crap they can do that under whatever place on the web they have. The tooling around following conversations across websites doesn't seem to exist though?


Really enjoying reading Ed Zitron's Where's Your Ed At. The latest post is an unfortunate story for Google Search.
Seeing more and more Github repos with renovate.json files as folks switch from Dependabot to Renovate. The app makes setup super easy. I'm pleased with it so far for the ~10 repos I've moved over.
I never really followed many folks on Nostr but I did at least update my Nostr -> RSS bridge to linkify URLs. A step towards embedding appropriate image/video tags in the RSS feed when things look like images/videos.
There is an open PR to improve Docker registry garbage collection. It helps clean up multi-arch images, which I tend to pull a bunch.
Giving it a try with a personal build it wound up reducing my registry size by about 50%!
In today's "Solving Problems I Create For Myself" news:
I updated my `docker-prefetch-image daemon to attempt pulling from alternative Docker repositories in the event an image pull fails.
This fixes the case where updating my Docker Repository infrastructure prevents pulling/running new Docker images. Now the prefetching will attempt to pull from my local repository and fall back to Docker Hub, then tag the image as if it came from my repository.
The Miniflux option on feeds ‘Disable HTTP/2 to avoid fingerprinting’ seems to fix any feeds that seem to be blocked (maybe by Cloudflare?).
Having an EV charger at vacation house is such a quality-of-life improvement. We didn’t seek out a house with a charger, but now I think we always will.
So I don't forget...
As seen on Reddit ...:
Don't forget to set the viewport when starting a new site
<meta name="viewport" content="width=device-width, initial-scale=1.0">
By far the best vegan meatballs we've made have been the It Doesn't Taste Like Chicken Vegan Italian Meatballs. Previous recipes we've tried have been black bean based. They tend not to hold together well enough. These ones don't fall apart!
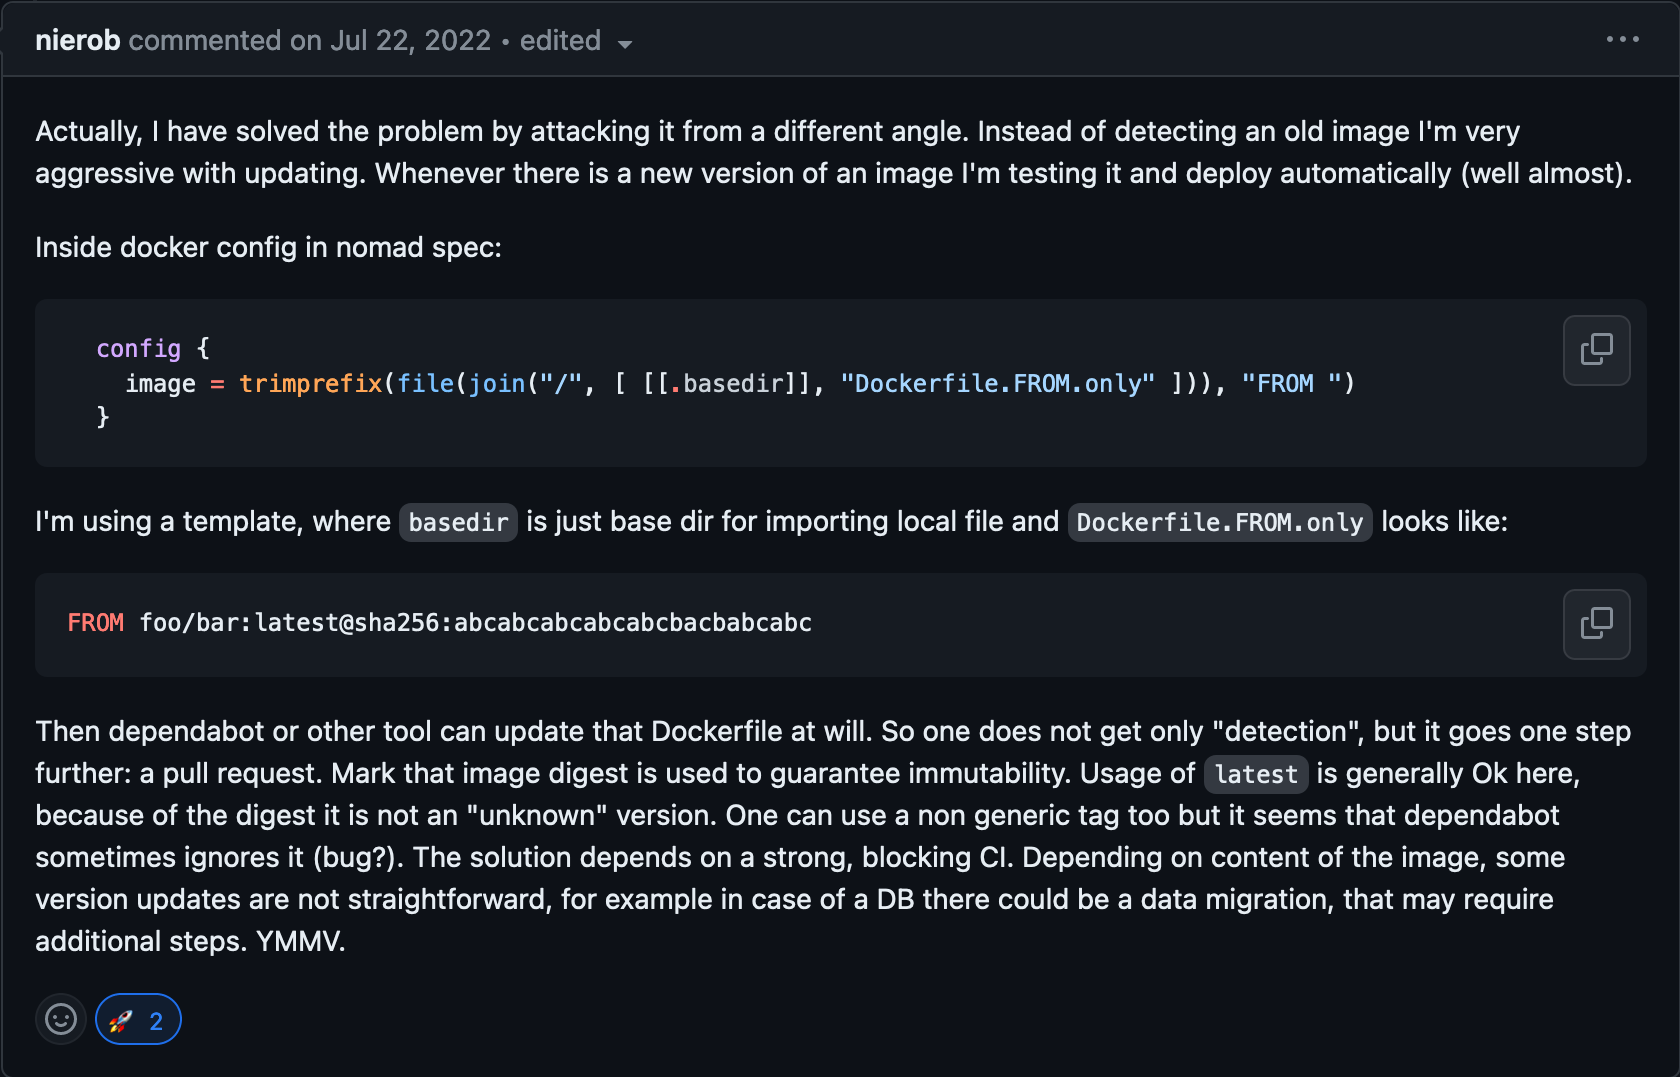
Automated Nomad Docker Image Updates
Posted onFor a few years now I've grumbled at updating Docker images in my Nomad homelab. Nomad isn't as popular as Kubernetes or Docker Compose and isn't supported in Dependabot.
Eventually I found this comment
I didn't think this was a great solution to my problem as I split up the registry from the repo/image so that I can pull images from my own repository. This solves the problem of Dependabot updating images though!
There was also an annoyance that I still need to copy these images into my Docker Registry. I've been using regclient's regctl image copy command as part of a Nomad job that makes this a bit easier.
Tada
If the Dockerfile now has a FROM [IMAGE] in the service directory the deploy process now looks like:
awkthe image outawk '/FROM/ {print $2}' Dockerfile- Dispatch the
regctljob with theIMAGE - Deploy the service job passing in the
IMAGEas a variable.
Dependabot doesn't seem to do great with monorepos without lots of copying.
Renovate does though!
Finally, a service that can autoupdate!
Merges on Github do not automatically deploy to my homelab so the final deploy takes 2 more commands to deploy (git pull and bash deploy) but this no longer requires any manual commits!
I recently tried running OpenLLM in my homelab. It was super nice to setup and run but pretty poor performance running models on CPU. A GGUF model on HF was running pretty quickly but OpenLLM doesn't seem to support GGUF.
Running text-generation-webui with a Mistral GGUF model has been really nice. The performance on an AMD Ryzen 3 5300U is super usable!
Towards a more useful Matrix Synapse healthcheck
Posted onI've been running Synapse for about a year at this point and it's been fairly consistently the software that gives me the most trouble for my homelab.
A part I've started to address recently is the ineffectiveness of the healthcheck endpoints. It always works! Which is a problem when the service isn't working and the healthcheck says it is. This is commonly when my Postgres server moves for some reason, Synapse never reconnects. It's a known issue.
I've worked around this with a healthcheck script that will probe the Synapse API
curl -fv http://127.0.0.1:{{ PORT }}/_matrix/client/v3/publicRooms -H "Authorization: Bearer {{ TOKEN }}"The TOKEN needs to be a user token which also gives this a bootstrapping problem where this check can only be in place after the server works. And a user changing their password will invalidate this token and take the server offline...
After a few days though it's solved my problem of Synapse breaking but pretending to be fine.