HVAC Journey: Mitsubishi Equivalent Pipe Length
Posted onWhile trying to debug problems with my HVAC system I came across "equivalent pipe length". Mitsubishi seems to omit this from installation manuals but includes it in their engineering manuals.
Equivalent Pipe Length accounts for the pressure drop of fittings, valves, or bends in a line to help simplify limits for a system. If a system has a max line length of 100' the measured distance of 100' would assume no additional parts in line to drop the pressure. If you add fittings, valves, or bends then the measured length would need to be below 100' to stay within the system limits specified as equivalent pipe length.
An example
As a practical example. Here is my system (as best I could model in Diamond System Builder):
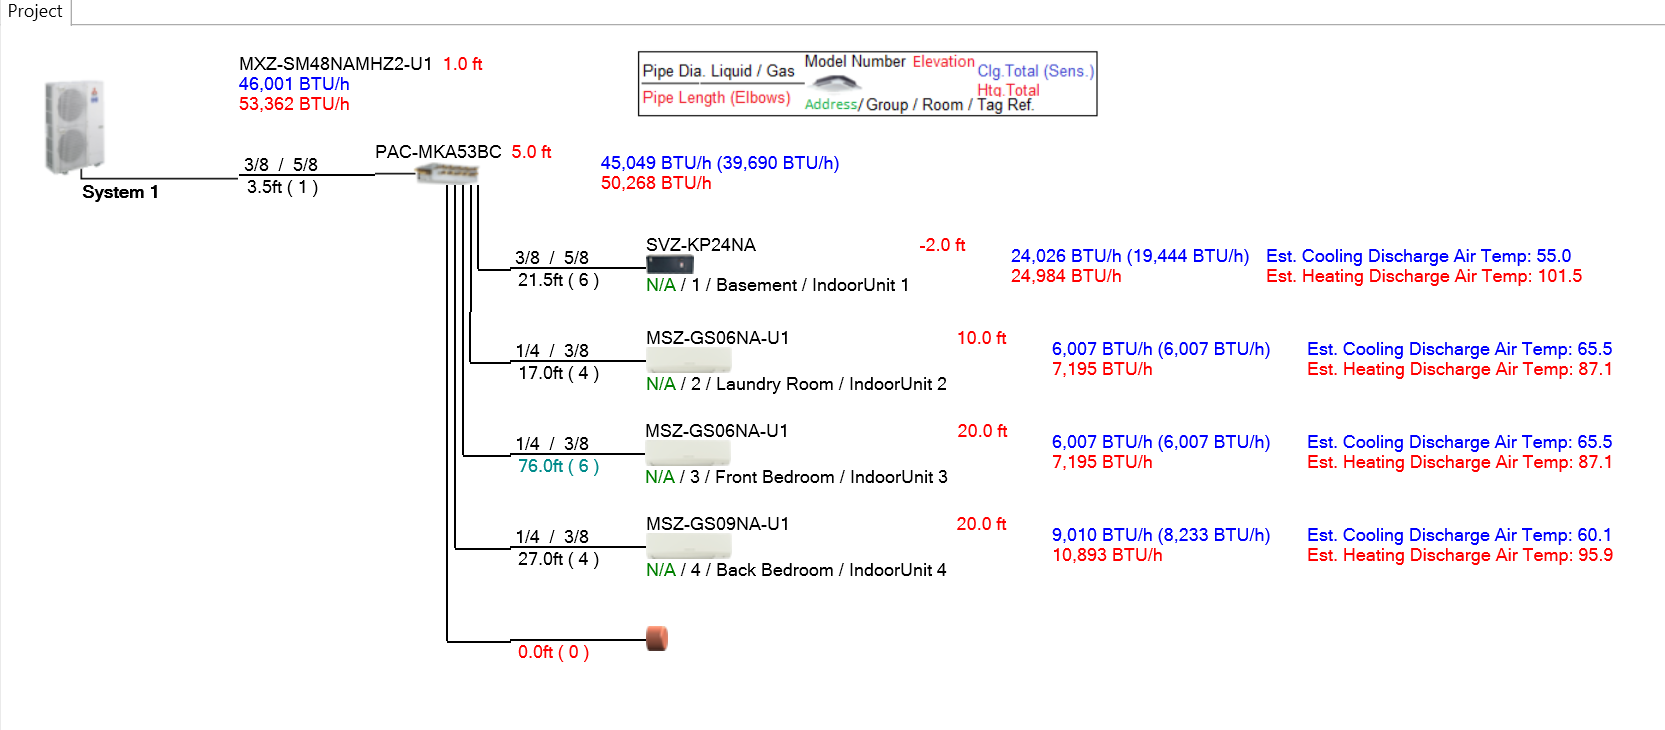
I have a single outdoor unit with 4 indoor units: a central air handler and 3 mini splits. The lengths listed in this diagram are the measured lengths. The system will calculate the equivalent pipe length automatically and check it against the equipment specifications listed, pretty cool.
I cannot however correctly model my system in Diamond System Builder though as the measured length for the Front Bedroom is 84', with 6 bends.
For my outdoor unit. The installation manual states the Farthest piping length after Branch box of 82'. The 82' is the equivalent pipe length NOT the measured pipe length.

I've confirmed with a Mitsubishi representative that the installation manual uses the equivalent pipe length, not the measured pipe length. This aligns with the System Builder where I can input 82' if I use 0 bends. The max length I can use with the 6 real-world bends in my system is 76'.
In the engineering manual there is a calculation for the equivalent pipe length on this system:

Which is why I can only input 76' feet with 6 bends (76' + 6 * 0.99' = 81.94').
How would someone know
I'm not sure how someone would know the installation manual uses equivalent pipe length. Maybe this is covered in training for Mitsubishi equipment. My Mitsubishi Diamond Elite contractors seem not to know about it though. Or at least this didn't seem to stop them from installing this equipment in what appears to me to be out of spec from the manufacturer.
HVAC Journey: Wall Mounted Mitsubishi Compressor
Posted onAt the end of 2024 my family started a project to remove natural gas / methane service from our house. As part that we began to replace our gas furnace with a heat pump.
The contractor mounted the outdoor unit on the wall of our house in a side alley that kept it out of the way.

This helps save space on the ground and mounting a couple feet above ground gives space for the condensate to drain when in the unit is heating our house. This does not help when the unit is a source of vibration and with the mounting causes structural vibrations in my house.
Mitsubishi has a helpful application note regarding the frequencies of the compressor at various times. During startup of a cycle in the 20-50 Hz range my house would vibrate and could be felt in various rooms through the house.
Pads (the blue/black pieces) were placed in the mounting to help address the issue.

They... might have helped. It's hard to say, I don't really have the tools to measure structural vibration. They did not help enough to avoid driving me crazy every time the compressor started.
What did solve the problem was moving the mounting to the ground.

This addressed the structural vibration issues to the point that I could no longer feel anything in my house.
Automated Nomad Docker Image Updates
Posted onFor a few years now I've grumbled at updating Docker images in my Nomad homelab. Nomad isn't as popular as Kubernetes or Docker Compose and isn't supported in Dependabot.
Eventually I found this comment
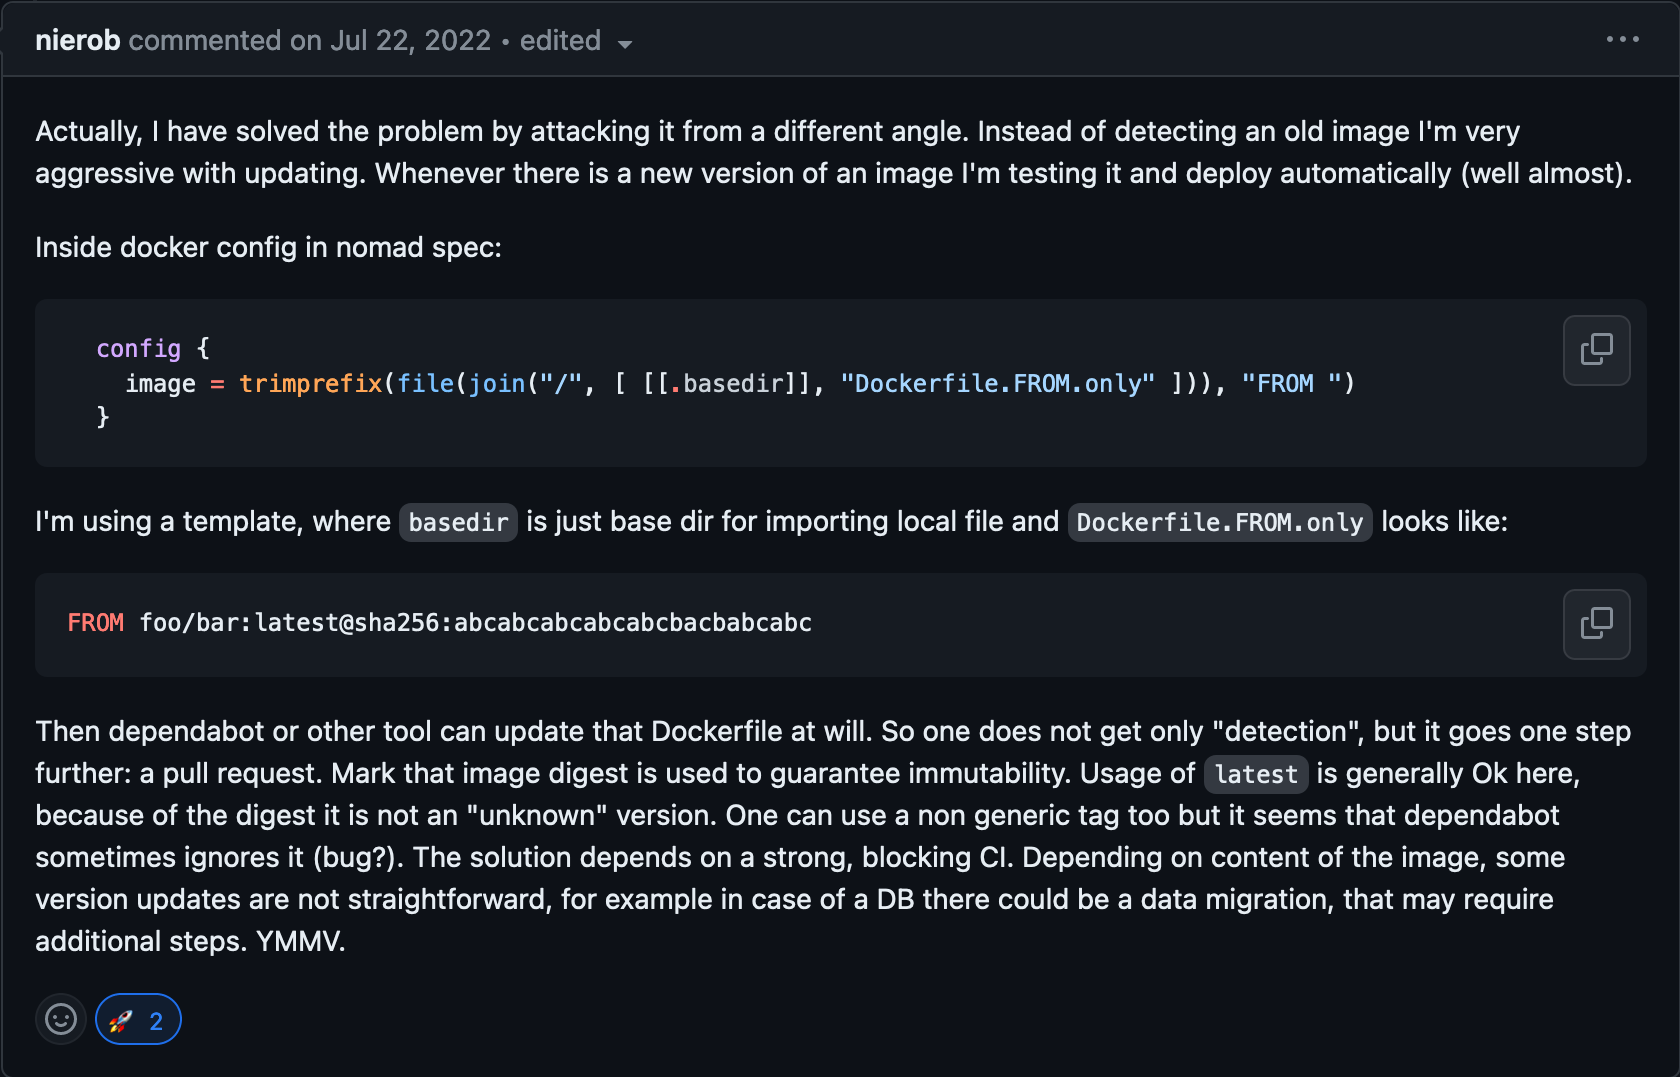
I didn't think this was a great solution to my problem as I split up the registry from the repo/image so that I can pull images from my own repository. This solves the problem of Dependabot updating images though!
There was also an annoyance that I still need to copy these images into my Docker Registry. I've been using regclient's regctl image copy command as part of a Nomad job that makes this a bit easier.
Tada
If the Dockerfile now has a FROM [IMAGE] in the service directory the deploy process now looks like:
awkthe image outawk '/FROM/ {print $2}' Dockerfile- Dispatch the
regctljob with theIMAGE - Deploy the service job passing in the
IMAGEas a variable.
Dependabot doesn't seem to do great with monorepos without lots of copying.
Renovate does though!
Finally, a service that can autoupdate!
Merges on Github do not automatically deploy to my homelab so the final deploy takes 2 more commands to deploy (git pull and bash deploy) but this no longer requires any manual commits!
Towards a more useful Matrix Synapse healthcheck
Posted onI've been running Synapse for about a year at this point and it's been fairly consistently the software that gives me the most trouble for my homelab.
A part I've started to address recently is the ineffectiveness of the healthcheck endpoints. It always works! Which is a problem when the service isn't working and the healthcheck says it is. This is commonly when my Postgres server moves for some reason, Synapse never reconnects. It's a known issue.
I've worked around this with a healthcheck script that will probe the Synapse API
curl -fv http://127.0.0.1:{{ PORT }}/_matrix/client/v3/publicRooms -H "Authorization: Bearer {{ TOKEN }}"The TOKEN needs to be a user token which also gives this a bootstrapping problem where this check can only be in place after the server works. And a user changing their password will invalidate this token and take the server offline...
After a few days though it's solved my problem of Synapse breaking but pretending to be fine.
Send Webmentions with Github Actions
Posted onAs I start working with webmentions I needed to find a way to publish webmentions as part of the build/release process for this site. I'm currently using Github Actions to build the site and upload to Netlify.
webmention.app came up frequently when I searched around for how to publish webmentions. It supports RSS/Atom as a feed, although the docs suggest using IFTTT to trigger webhooks. Github Actions can do that though! For whatever reason webmention.app didn't seen to find any links in my feed. As I was trying to figure out why by using the command line I discovered that the CLI version was able to find the links in my feed!
Adding this as a step post-release
- name: Send Webmentions
  run: |
    npm install @remy/webmention
    npx webmention ${{ secrets.WEBMENTION_TARGET_URL }} --limit=0 --send
In my pull-requests I have a variation of this, removing --send and using the temporary Netlify URL for the PR so I can see what webmentions would be sent.
As part of using my atom feed for this I now only include the last 10 posts in my feed to avoid sending lots of old webmentions, most of which didn't seem to work as the links are dead.
Starting Webmentions
Posted onIs anyone using webmentions? I've added Webmention.io for hosting my webmentions at the moment as this is currently a static site. If you're using them please try and mention this page and I can hopefully see in my RSS reader!
Testing things
Also trying to send them as part of my site build process. Maybe this will work?
Prefetching Docker Images
Posted onWhile running Nomad I've been running into a bootstrapping/critical path problem. I have a Docker Registry running in the cluster and pulling an image requires:
The Registry is required to serve the image.
Traefik routes the requests to the Registry as well as requesting Lets Encrypt certificates
GoCast announces the floating IP for Traefik
Minio stores the images for the Registry
Problems updating images
Separate from bootstrapping, just updating the image of many of these will require everything to already be running, just to pull the next image. There is an open bug to address this in Nomad, but it doesn't seem like it's going to be resolved anytime soon.
When updating Traefik I run into a condition that GoCast has created the floating IP addr on the host but Traefik isn't running. The floating IP won't work while Traefik is running-but-not-serving. GoCast BGP is working correctly in that the floating IP is not accounced to the network, but the updating host still can't reach the other-host instances of the floating IP. I'm not sure if leaving the addr in place is a feature or a bug.
A way around this would be to run multiple instances of Traefik on each host. As currently setup though I need to bind multiple instances of Traefik to the same ports and SO_REUSEPORT isn't supported. With GoCast I could map the floating IP ports to container ports and not require host networking (thus avoiding the port collision) but that may be quite burdensome to manage. I also haven't tried running multiple ports with GoCast NAT'ing.
Solving part of the problem
For the Traefik case of not being able to pull the image there are some workarounds. Manually pulling, or system batch jobs could solve this but is fairly manual.
regclient has a daemon mode that can pull/sync images to registries, but it doesn't support pushing to a Docker Engine.
Docker Prefetch Image
I've started on a tool to prefetch Docker images based on a config file. Updating the config file appropriately to match the image used in Nomad Jobs is still a problem. This uses the Docker Engine API via the Rust docker_api crate to pull the image to the host.
Nomad Consul Template though can populate the config file from Consul to avoid manual file updates thought which isn't terrible. I'm not sure if there is a nice way to integrate with the Nomad API to watch what images might be needed and pull the in in advance of any job using it.
This has solved my case for updating parts of the critical path of Docker Image hosting. It doesn't fully solve the bootstrapping case though where none of the services are running yet. An idea though is to extend the config/API calls to have the "expected" image tag Nomad would look for and a "source". If the "expected" image cannot be pulled, try the "source" and tag it locally as the "expected" tag. This would allow prefetching all images required for bootstrapping the system!
What I want for a Queue System
Posted onI've been interested in queue systems since first learning about and using RabbitMQ in ... 2009 (woah... it's been a minute). What I've learned through most of this is that:
- People won't care as much as me
- You can't make people care
- If they don't care then it's even easier to make mistakes.
Redis is quite popular as a queue system and I've joined multiple companies/teams where Redis and Python-RQ were used for async tasks. Redis is wonderful and is a great solution to many problems (including async tasks!) but in the cases I have seen, it's been mostly an incomplete, improper solution.
Google Pub/Sub is pretty wonderful generally and the pattern I love most is combining Pub/Sub and Cloud Run for HTTP delivery of events. There are some limitations with this pattern but I love most of all the removal of many problems developers can cause.
Event -> HTTP -> Service makes handling events much easier.
- It's difficult to run tasks for hours from a single HTTP request
- Handling of events requires little knowledge of a particular library
- Much of the complexity doesn't need to be in the app
- Removing the complexity from the app makes it easier for more apps to use it, without lots of work
I can't run Pub/Sub and Cloud Run at my house though.
What I want from a queue system
- HTTP and/or GRPC submission of events to the queue system
- HTTP and/or GRPC push to a service
- Possible to run in a home environment, but not the-worst-idea in a larger environment
- Back-pressure. When too many events are in the system the publishing will slow down.
- Easy to run and not worry about it
- Small idle footprint in memory/CPU
- Horizontal scalability. If it's ever used in production somewhere, adding capacity should be easy.
What I don't need from a queue system
- Super high throughput. 10k events per second is wonderful... but if it can do 100 and scales out, I'm not too worried.
- Perfect durability. I'll assume that at some point data might be lost and those outliers are OK.
- Perfect deliverability. I normally add end-to-end checks for data that a dropped event will only cause a delay, not a consistency problem.
What to do about it
I haven't found exactly what I'm looking for in other systems. Since I'm mostly scratching a self-hosting itch at the moment I'm looking to throw together a sample system to solve my problem, never expecting it to go beyond that (although maybe it will be useful for someone else?)
As I learn Rust, connecting Axum, Rust channels and Reqwest should get me pretty far.
And the real goal here is to use a simple enough system similar to what I'd recommend for production use cases with cloud services (and not my homegrown thing).
Nomad Events Logger
Posted onAs part of learning Rust I built a tool to read events from the Nomad Events API and log them to stdout. This allows an easy, low-resource way to pull Nomad cluster events into your log processing stream.
Low-resource as in ~4MB of memory for the Docker container!
Nomad Events Logger is deployable as a Docker image, and if I get around to it, a native binary as well. At the moment I run ~everything in Docker in my Nomad cluster so let me know if you want other formats.
Paperless-ngx Celery won't consume documents
Posted onWhen running Paperless-ngx I ran into a problem where the Celery process in Docker (as part of supervisord) would start, supervisor would report it running, but the Celery process appeared to do nothing.
The last related lines I would see were:
INFO success: celery entered RUNNING state, process has stayed up for > than 1 seconds (startsecs)
[INFO] [paperless.management.consumer] Adding [REDACTED] to the task queue.
I'm not sure what part of Celery does this, maybe it's just Paperless? But eventually I found a .__celery.lock file in the Paperless data directory. Removing that allowed everything to work again.
This was likely caused with Nomad terminating the process and the lock file not getting cleaned up. I now have my Nomad job remove .*.lock files before starting Paperless.
More Declarative Containers with NixOS
Posted onIn newer versions of NixOS it's possible to use Docker directly in your /etc/nixos/configuration.nix!
Example from that page:
 { config, pkgs, ... }:
 {
   config.docker-containers = {
     hackagecompare = {
       image = "chrissound/hackagecomparestats-webserver:latest";
       ports = ["127.0.0.1:3010:3010"];
       volumes = [
         "/root/hackagecompare/packageStatistics.json:/root/hackagecompare/packageStatistics.json"
       ];
       cmd = [
         "--base-url"
         "\"/hackagecompare\""
       ];
     };
   };
 }
I've moved to this format as it's a bit cleaner and simpler to use for syncing container images than rkt wound up being.
Risks With Git Tag Triggered Deploys
Posted onGit workflows can come in many flavors. Once the code hits a continuous integration system your workflow will need to trigger a deploy to production. A common way of handling this is to create a Git tag that will trigger the deployment. Using a Git tag to trigger the deployment can lead to increased risk against safely deploying your code.
These risks can be countered in multiple ways, but these are patterns I've seen in the deployment process for various services.
Tags can be pushed by anyone with write access
Your process may allow anyone trigger a deploy to production. In many ways this is a good thing. In GitHub though, certain branches can be protected in order to enforce a certain workflow such as requiring each pull request receive approval from 1 other person.
Tags in Github do now have such a protection. Anyone with write access could push a tag, bypassing the Github workflow.
Tags do not have an order
Any commit in the repository can be tagged. There is little difference (to Git) between a tag on the latest commit and a tag on a commit from 3 months ago. If your process relies on some semantic meaning for these tags you will have to encode that information and handle it in your deployment automation.
Declarative Containers with NixOS
Posted onI spent some time recently attempting to setup some software on a NixOS system I have at home. It looks like declarative containers were removed in an earlier version of NixOS as they weren't quite ready for use. After some searching I was able to find an example with rkt!
Setting up a container can be as simple as adding this to your /etc/nixos/configuration.nix:
virtualisation.rkt.enable = true;

systemd.services."rkt-nginx" = {
  description = "Nginx (rkt)";
  wantedBy = [ "multi-user.target" ];
  serviceConfig = {
    Slice = "machine.slice";
    ExecStart = ''\
      ${pkgs.rkt}/bin/rkt run --insecure-options=image \
      --net=host \
      docker://nginx
    '';
    KillMode = "mixed";
    Restart = "always";
  };
};
OmniosCE Networking on OVH
Posted onI recently found that my DHCP leasing on OVH was unreliable. The address worked at one point, but after a few months/reboots I found that the instance could not longer obtain a lease. After a few attempts to release/renew, I decided to set a static IP.
The General Administration page has general information about setting this. The IP from your OVH control panel for the specific server is needed. From that information the routing gateway can be determined.
The gateway is the same as the IP of the server with the last octet replaced
with 254. If the IP is 10.2.3.4, the gateway is 10.2.3.254. To set this on the host:
ipadm create-addr -T static -a $SERVER_IP/32 ixgbe0/v4
route -p add default $GATEWAY_IP
Listing All Versions of an IPS Package
Posted onListing all packages (with FMRI) can be useful to see what you could install. It wasn't immediately obvious to me and couldn't easily find how to do.
pkg list -afv $PACKAGE-af lists all versions, regardless of installation state
-v Includes the FMRI in the output
If you don't see a newer version you think should be there, try a pkg refresh!
Copying IPS Packages Across Repositories
Posted onWith the release of OmniosCS I've found myself needing packages from OmniTI's Managed Services repository.
My first attempt was to copy packages with pkgrecv. This however caused problems where the IPS server doesn't know about the repository. Adding the repository to the IPS server didn't fix the problem.
This can be fixed by changing the repository FMRI before uploading.
Deploying This With CircleCI
Posted onDespite using automated deploys for most things I work on I had put off setting up such a mechanism for this site. Not sure what took so long.
With CircleCI I added a circle.yml file of:
dependencies:
  override:
    - pip install -r requirements.txt

test:
  override:
    - make build

deployment:
  deploy:
    branch: master
    commands:
      - make upload
And then an S3 user with the right permissions.
{
    "Version": "2012-10-17",
    "Statement": [
        {
            "Sid": "Stmt1492350849000",
            "Effect": "Allow",
            "Action": [
                "s3:*"
            ],
            "Resource": [
                "arn:aws:s3:::philipcristiano.com",
                "arn:aws:s3:::philipcristiano.com/*"
            ]
        }
    ]
}
Execute AWS User Data on OmniOS
Posted onAs I started to use the OmniOS on AWS I ran into the problem that it does not, by default, include a way to execute the AWS User Data script when starting an instance. The User Data scripts provides a wonderful mechanism to bootstrap new instances. Without it, you may be required to use a configuration management tool or manually configure instances after they have booted.
The script is helpfully available through the instance metadata
API
at 169.254.169.254 with the URL http://169.254.169.254/2016-09-02/user-data. It
should be simple to pull that down and execute the script with SMF!
I've put together a script to do this.
It runs with SMF with a default timeout 15 minutes and will restart if there are errors.
There is a handy dandy install script in the repo that will download and install the
needed files. At the moment this isn't packaged as this script is needed before I would
set up a package repository.
There is still the problem of how to get this into an AWS AMI. Packer can build the image for us so that the AMI we launch will already have this script. The buildfile for this image is rather simple but the whole process is a powerful one.
To get your own OmniOS AMI with AWSMF-Data installed you can use the above Packer build.
-
Install Packer
-
Clone the repo
$ git clone https://github.com/philipcristiano/packer-omnios.git`- Execute
build.shafter setting a few variables
$ export AWS_ACCESS_KEY_ID=...
$ export AWS_SECRET_ACCESS_KEY=...
$ export VPC_ID=...
$ export SUBNET_ID=...

$ ./build.sh
VPC_ID and SUBNET_ID are only required if you have a need to specify them
(like no default VPC in your account), in which case the build.sh can be
modified.
From here we can create User Data scripts in AWS and have new EC2 instances run code when they start!
How To Package a Service For OmniOS
Posted onA previous post showed how to install files. If you wanted to run a service from that package there are a few more steps.
Service Management Facility
The Service Management Facility provides a way to manage services in OmniOS. If you are running a service you installed from a package, this is the way to do it.
Steps to Package and Run a Service
We will need to complete a few steps to package up a service and deploy it with IPS.
-
Create an SMF manifest that instructs SMF how to run our service
-
Deploy the SMF manifest
-
Start the service.
Optionally, the service can be modified to read SMF properties so that it can
be configured through svccfg
Tools
Creating an Echo Server
Creating an SMF Manifest
A service manifest is an XML documents that contain the information required to run a command as a service. This would normally mean that you have to create a new XML document for each service. Thankfully there is the tool Manifold that can create an manifest with answers to the relevant questions.
How to Package Your Software for OmniOS
Posted onPackaging for OmniOS goes over how to create a package using the same build system as is used for building OmniOS. The layout of this repository seems designed for building already written software to be used in OmniOS. If you need to package your own software then this can be more overhead then you are looking for. The tools used by that GitHub repository are included in the default installation of OmniOS and have plenty of documentation on Oracle's site about how to use IPS. It turns out you can start making packages for OmniOS with only a few commands.
This post will cover the tools required to create a package, not necessarily best practices in packaging for OmniOS.
I've created an example repository that can build and upload a package to an IPS package depot if you want to skip ahead.
Tools
The packaging commands we will be using are
-
pkgsend - Generates the package manifest and publishes the package
-
pkgmogrify - Transforms the package manifest
-
pkglint - Linter for package manifests
-
pkgfmt - Formatter for package manifest
-
pkgrepo - (optional) Refresh the repository search index after upload
Example Application
We will be packaging a Hello World script stored in hello-world.sh.
#!/usr/bin/bash

echo Hello World!
This file needs an execute bit as well so we will run
chmod +x hello-world.shBuilding the Manifest
pkgsend will generate a manifest for us if we can build a directory that
mimics the deployed layout. If we put our script in build/usr/bin (and remove
the extension) then run pkgsend generate build we will get a manifest of
files and directories to package.
$ /usr/bin/pkgsend generate build
dir group=bin mode=0755 owner=root path=usr
dir group=bin mode=0755 owner=root path=usr/bin
file usr/bin/hello-world group=bin mode=0755 owner=root path=usr/bin/hello-world
Our manifest so far says we need two directories and a file. This would be
enough of a manifest to start with but can be problematic if the directories
don't line up with the host used to install the package. It would be better to
remove the directories and assume that /usr/bin already exists on the system,
since it really should already be there.
The command pkgmogrify can take a manifest and a transform file and output a
transformed manifest.
A simple transform to do this will be stored in transform.mog
<transform dir path=usr -> drop>This will drop any directories that include the path usr. If you need are
building a more complex directory structure then using something like
usr/bin$ as the path will only drop the common /usr/bin elements from the
manifest.
For this we will write the manifest to a file the mogrify it to remove the directories.
$ /usr/bin/pkgsend generate build > manifest.pm5.1
$ /usr/bin/pkgmogrify manifest.pm5.1 transform.mog

file usr/bin/hello-world group=bin mode=0755 owner=root path=usr/bin/hello-world
This now has just our script in the manifest. Using pkgmogrify we can easily
script changes to manifests instead of relying on manual changes to clean up a
generated manifest.
We'll write the updated manifest to a new file
$ /usr/bin/pkgmogrify manifest.pm5.1 transform.mog > manifest.pm5.2Package Metadata
We have the manifest for what the package should contain but we still need to describe the package with metadata. We will need to include at least a name, version, description, and summary for the package.
The name and version are contained in an Fault Managed Resource Identifier or FMRI.
I recommend reading the link above about proper format and conventions for
FMRIs but for now we will write metadata.mog to contain
set name=pkg.fmri value=example/hello-world@0.1.0,0.1.0-0.1.0:20160915T211427Z
set name=pkg.description value="Hello World"
set name=pkg.summary value="Hello World shell script"
We can use pkgmogrify to combine our metadata and current manifest file to
make a file manifest used for publishing our package. In this case we use
pkgfmt to format the file as well.
$ /usr/bin/pkgmogrify metadata.mog manifest.pm5.2 | pkgfmt > manifest.pm5.finalLinting
The manifest we have now should work for publishing the package. We can verify
using pkglint on the final manifest to check.
$ /usr/bin/pkglint manifest.pm5.final
Lint engine setup...
Starting lint run...
$ echo $?
0
No errors or warnings, wonderful!
Publishing the Package
We now have a directory structure for the package we would like to create as well as a manifest saying how to install the files. We can publish these components to an IPS package depot with pkgsend
$ pkgsend publish -s PKGSERVER -d build/ manifest.pm5.final
pkg://myrepo.example.com/example/hello-world@0.1.0,0.1.0-0.1.0:20160916T182806Z
PUBLISHED
-s specifies the package server, -d specifies the directory to read, and we pass along the path to our manifest. Our package was then published!
Troubleshooting
If you are using an HTTP depotd server to publish and see the error pkgsend: Publisher 'default' has no repositories that support the 'open/0' you will
need to disable read-only mode
for the server or publish to a filesystem repository.
Refresh the Package Search Index
The HTTP depotd interface doesn't refresh the search index when a package is published. This can be done with the pkgrepo command.
$ pkgrepo refresh -s PKGSERVERRefreshing pkg.depotd After Package Upload
Posted onAfter uploading a package to an OmniOS package repository I was unable to find
the package by searching. The package could be installed and local searching
would find it, but the depotd server didn't know how to find the package when
searching. Restarting pkg/server would work around the issue but having to do
that after each publish would get annoying.
There is a command pkgrepo that will refresh the search index remotely!
Running
pkgrepo refresh -s PKGSRVRis enough to reload the search index.
Error Publishing to pkg.depotd
Posted onWhen publishing to an IPS depotd server you may see the line
pkgsend: Publisher 'default' has no repositories that support the 'open/0' operation.If the depotd server will show you a web page but publishing does not work with
pkgsend you may have the server setup in read only mode. svccfg will allow you to change the property with
svccfg -s pkg/server setprop pkg/readonly = falseDon't do this to a server on the internet though, placing an HTTP server in front of depotd will allow you to add authentication. This is otherwise insecure!
Building IPS Packages For OmniOS
Posted onI've started trying to package some software for OmniOS for personal use. The OmniOS Packaging page in the wiki goes through how to do it using the tools used to build the OS. This is a bit more than I would want to do when publishing software to GitHub. I would rather not rely on a repository used to build the OS just to package one piece of software.
A few months ago I was trying to package a personal project and got most of the way there! So far there is a make target that will package an Erlang release into an IPS package. I think it only got as far as putting the files on disk. I still to add the SMF manifest and fix permissions, but it's much smaller when used to package a single piece of software.
Upgrading OmniOS is Surprisingly Easy
Posted onAs part of the process of shaving some yaks today I wound up needing to upgrade my development server to the latest version of OmniOS. I originally installed the LTS version and planned to stay there till the next release. It turns out there isn't much reason not to upgrade to the latest version. You will get needed security updates either way but be able to get around any bugs with OS-related things that have been fixed in the mean time.
The Upgrading to r151014 or
later page had the
needed information and worked quickly. I ran into an issue with the datasets
for my zones causing the problem pkg: Unable to clone the current boot environment when trying to update with pkg. All the zones I care about
are recreated with configuration management so I didn't have a problem
destroying the dataset and recreating them. If it were production I would
have at least snapshotted the needed datasets before destroying them.
For the next release I think I'll update a bit sooner!
Ansible ZFS Bug For Solaris
Posted onWhile updating Ansible I ran into an issue with an extras module for ZFS and Solaris. A playbook that used to work to set a mount point no longer worked. I was seeing errors that ended in
if int(version) >= 34:\r\nValueError: invalid literal for int() with base 10: '-'\r\n", "msg": "MODULE FAILURE"An issue was
filed in June
and fixed last month. This change isn't in the latest Ansible 2.1.1.0 which I
was using. For the time being I've added the
extras repository devel
branch as a submodule and used ANSIBLE_LIBRARY=... to get a fixed version.
LambdaPad
Posted onI recently came across a static site generator written in Erlang called LambdaPad. I looked around a bit while trying to find a static site generator that would work with Contentful that I would enjoy working with. Most static site generators expect to source documents from the filesystem but LambdaPad allows any source of data you can write in Erlang!
Contentful is a CMS with an API and is free for small use cases. It is easier to use their API as a source then to have other people edit a Git repository in my expected case.
My Github has a branch that can source Contentful entries and provide them to templates. After adding some documentation, examples, and handling Contentful pagination it should be ready for a PR.
... another example of me spending more time on infrastructure instead of a user-facing project which began this tangent!.
OmniOS on Vultr
Posted onThis week I started trying to install OmniOS in a Vultr instance. I'm not sure where I first saw Vultr listed but was drawn to it because they offer custom ISO installs. OmniOS isn't supported by most hosting vendors so I would need to install via a custom ISO.
Setting up an account was quick on Vultr, including $5 free credit for opening an account. When creating a new instance you can select the custom ISO after you've added it via URL to your account. They will transfer the ISO to the right datacenter, attach it, then boot up the instance.
The ISO booted fine but installing OmniOS onto the instance didn't work. It turns out that the OmniOS installer doesn't like the way Vultr exposes disks as block devices to the instance. This was mentioned by Dan McDonald in the #omnios channel after he helped me debug. Originally I tweeted about trying to install it and he followed up. He was very helpful and mentioned that the installer is due to be replaced which will work around this issue, but it won't be right away.
It seems just running OmniOS on baremetal is the way to go. I might wind up getting a colo'd box at this point.
Debian Packaging an Erlang Relx Release
Posted onCreating an Erlang release with Relx is straightforward and quick but you still need to get it onto a machine. You could script something yourself, maybe even using a configuration management tool. You could also create a Debian package which would make your sysadmin happy and even make it easy to uninstall!
In this example I'll use FPM although
the Debian toolchain would work as well. This will assume that you can already
make a release with Relx and that you put your release files into rel within
your project. This may not follow all Debian best-practices but it will give
you a .deb file that will install and look kind of like any other package.
The package will include the Erlang Runtime System so you won't need to install
Erlang on the target system or any other dependencies before installing your
package.
Application configuration
You likely already include a sys.config file with your release but it would
be nice to be able to configure the release after the package has been installed.
This is usually done with files in /etc or /etc/PACKAGE. Your sys.config can
be easily updated to make this happen!
Assuming you aren't configuring anything to start your sys.config would look like
[].With a relx.config including
{sys_config, "./rel/sys.config"}.To make this include an /etc file using the config
documentation says you can include
a file path (absolute path preferred). This would make your Relx sys.config
look like:
["/etc/PACKAGE/PACKAGE.config"].Simple! We don't need any post-install configuration right now but we should include
the config-less file so that Erlang can find it when trying to use sys.config Create
a file in rel/PACKAGE/PACKAGE.config:
[].Now this file can be updated with your configuration management tool without requiring changing any files within the release!
On Debian/Ubuntu systems it's not uncommon to have a /etc/default/PACKAGE file as
well that allows you to add any environment variables you would like to use for
your application. I ran across this needing to set the ulimit. For now
we will create a file in rel/etc/default/PACKAGE that sets the ulimit.
ulimit -n 65536Making a user
It's nice to have a system user that runs your release and not require some other
tool to create it. This can be done with FPM's --before-install option to pass
in the path to an appropriate script. More can be included but for now we will
create a file rel/before-install with the contents
adduser PACKAGE --systemSo that before this package is installed dpkg will create the user for us.
Init
Your release should generally start right after the system does and it is
helpful to follow the standard init system of your distribution. This becoming
SystemD or Upstart depending on your distribution/derivative but for this
example we will stick with SysV-style init. This get slightly more complex but
we will start with the example and then walk through each line. This requires
that you use the extended start script from Relx with the option
{extended_start_script, true}.
#!/bin/sh
HOME=/opt/PACKAGE/

[ -f /etc/default/PACKAGE ] && . /etc/default/PACKAGE

mkdir -p /var/log/PACKAGE

chown -R /opt/PACKAGE /var/lib/PACKAGE /opt/PACKAGE/log /var/log/PACKAGE

su PACKAGE -mc "/opt/PACKAGE/bin/PACKAGE $@"
First #!/bin/sh, use the sh to execute.
Erlang and your release really want a HOME variable. We will for now install
the application into /opt so that /opt/PACKAGE will be used as HOME
Next we test for the defaults file we created before and if it exists we will source it into this script. While the package will create the file it's still polite to check if it exists before sourcing.
mkdir and chown are used so that the log/var directories and the release
itself all belong to the user we created in before-install. More directories
can be added if you need something specific.
Finally with su we will pass the arguments to the init script through
to the extended start script from Relx. The extended start script includes
things like start and stop that are familiar for an init script but
also includes ways to easily get a remote console connected to the Erlang
VM!
Since this script will use a dir in /var/lib create the respective directory
within rel rel/var/lib/PACKAGE
Creating the Package
Until now we just created files that would be used by FPM, now we can tell FPM to create the package. This could be done on any OS, not just the one that you intend to distribute the package to, but it's generally easier to use the same OS as we will include the Erlang Runtime System with the package as well.
fpm -s dir -t deb -n PACKAGE -v VERSION \
	--before-install=rel/before-install \
	_rel/PACKAGE=/opt/ \
	rel/init=/etc/init.d/PACKAGE \
	rel/var/lib/PACKAGE/=/var/lib/PACKAGE/ \
	rel/etc/PACKAGE/PACKAGE.config=/etc/PACKAGE/PACKAGE.config \
	rel/etc/default/PACKAGE=/etc/default/PACKAGE
Going through some of the options
-s dir says to create this package from a directory, instead of some other
packaging format (of which FPM supports many!)
-t deb creates a Debian package as output
-n PACKAGE name the package
-v VERSION Give the package this version. This should probably be determined
by your Makefile or build system and not be hardcoded.
--before-install=rel/before-install Adds the before-install script for FPM
so that it can be executed when you are installing the package.
The rest of the options tell FPM to take the relative file location and place it
at the absolute location when installing the package. This includes the release
into /opt/, our init script, var/lib directory, etc config, and defaults
file.
You now have a package!
Running this command will create the package for you and output a .deb file
you can install on another machine. This includes ERTS and requires no dependencies
beyond what comes in a fresh install! If you've found this helpful please let
me know on Twitter!
Testing Riak Core VNodes
Posted onI've started trying to test ETSDB with Common Test and found that it wasn't terribly straightforward to test the Riak Core vnode. The vnode is managed by a Riak Core gen_fsm and isn't a built-in OTP behavior.
I wanted to include the Riak Core gen_fsm to make sure that I integrated it
properly. First you want to spin up the riak_core_vnode with your vnode
implementation and save the config in the Pid.
Similarly to tear it down you should send a message to stop the FSM. This requires a
tear down call and adding a handler in your vnode to return a stop.
That includes the send_command which is a variation from the Riak Core
source. It will handle sending the message in a way that can get the response
sent back to the sending process. Riak Core does some mucking around to deal
with running with the full application.
Now you can call send_command with the Pid of the FSM and with the ref
returned can pull that messages out of the mailbox!
LevelTSDB
Posted onI've started splitting out useful time-series database functions from ETSDB into their own library as LevelTSDB. This is mostly so I don't have to test everything again for some things I would eventually like to make.
Nikola Generator
Posted onStarting to use a new static site generator now that there are bunch of good ones in Python. I find Python/pip more sane to use than Ruby/bundler/rbenv
Deploying Python Without Downtime
Posted onWhen you first start out deploying your application it can be easy to just run
supervisor restart all or service my_app restart to get your current
version into production. This is great when you are starting out but eventually
you will try to connect while your application is starting up and see HTTP 503s
while you application is booting up.
Eventually you might discover that Gunicorn and uWSGI can reload your application without closing the socket so your web requests will just be delayed a bit delayed as your application starts. This works fine as long as your application doesn't take too long to start. Unfortunately some applications at work can take a minute to start, too long to have connections waiting at the socket.
The Gunicorn reloading using kill -HUP $PID will stop
all worker processes then start them again. The slow init for workers tends to
cause problems. uWSGI has chain
reloading
which will restart workers one at a time. I need support for Tornado which
doesn't fit well with uWSGI.
With a Load Balancer
A common technique is to remove a single server from the load balancer, upgrade/restart the application, then bring it back. We are using load balancers but it requires coordination while provisioning nodes using the HAProxy management socket in order to schedule this. Our deploys currently deploy to all nodes simultaneously, not one-by-one, an even larger change. It would also be possible to fool the healthcheck by 404'ing the status page then waiting for LBs to take the node out of the pool. That requires a bit more waiting than I want, 2 healthcheck failures with 5 second intervals, for each server, plus time to reintegrate the web process once the upgrade is finished.
Gunicorn Reload ++
Gunicorn will automatically restart failed web processes so it would be possible to just kill each process, sleeping in between, until you get through all the child processes. This works but if application start times change significantly we are either waiting too long for restarts or not long enough and risking some downtime.
Since Gunicorn includes Python hooks into the application it should be possible
to write a snippet that will notify the restart process when the worker application
is ready. Gunicorn didn't have the needed hook but it was simple to contribute
the change. It requires master until a new release is made.
Now our restart process takes advantage of the fact that a single socket has multiple processes accepting connections. Restarting will slightly diminish our capacity (1/N) but we will continue to handle traffic without letting connections wait too long.
The general process for this is
  for child_pid of gunicorn-master:
    kill child_pid
    wait for app startup
My first version of this used shell and nc to listen on UDP for an
application startup. This worked well although integrating our process manager
into shell was a bit more then I would like to do.
The restart script should be called with the PID of the Gunicorn master restart.sh $PID
and works in tandem with a post_worker_init script that will notify the script
when the app is running.
If we had this WSGI application for example:
We could even do things like check the /_status page to verify the
application is working.
Be careful with trying to run too much of your application in this healthcheck,
if for any reason your post_worker_init raises an error then the worker will
exit, preventing your application from starting. This may be a problem when
you are checking a DB connection that may go away, even if you application
could work it won't be able to boot.
Now with our applications that take a minute to start we can do a rolling restart without taking the application down or dropping any connections!
Cropping Faces at SeatGeek
Posted onI wrote a blog post for SeatGeek's Dev blog about my recent work automating image cropping with OpenCV. We use this to generate images for our iPhone app, upcoming iPad app, and throughout our site.
It reached top 10 on Hacker News and was generating 20% of the traffic to our site for a period of time after it was submitted. Given it's success I'm working on a post regarding recent changes I've made to our deploy process as well.
Ordering of Rebar Dependencies
Posted onAs I am starting out with Erlang I've just added dependencies to the end of
my Rebar config and everything just kind of worked. I added each dependency
one-by-one and didn't have a problem until I cleaned out the deps folder
and tried to recompile. Then I ran into this error:
src/ranch_protocol.erl:none: undefined parse transform 'lager_transform'
I knew that it was working before and that the parse transform wasn't an issue. Turns out the dependency ordering matters! Shouldn't be too big a surprise but Rebar uses the list of dependencies as the ordering for compilation, not any kind of introspection. I just had to put the Lager dependency above Ranch and everything worked out.
SeatGeek RSS
Posted onI've setup an RSS feed for local concerts powered by SeatGeek. We (at SeatGeek) don't have one built-in but we do have an API. The page isn't pretty but I find it useful for finding any events I may want to go to. With tagging in NewsBlur I can filter events more easily.
I built this with Erlang as a way to test out the language. There isn't really a direct need for high concurrency but it was a good chance to give it a try. I've learned that I really like Erlang, it's rather terse and has constructs built into OTP that make writing software a joy. At some point I need to tackle using releases, but I'm not there yet.
When I spend more time on the RSS feed I'll eventually include affiliate links. It takes a lot of traffic to make money with affiliates especially at most concert prices. But maybe it will be an incentive for me to turn this into something even more useful.
More on RabbitMQ Priorities
Posted onWith a single process consuming from multiple queues the prefetch count could be a good enough solution to balancing the work from each queue.
After you have set up priorites with multiple queues you still need to consume from them. You could setup separate processes for each queue or a single process that consumes from multiple queues.
I usually set consumers to a prefetch count of 10, it works well enough and latency isn't much of a concern. When consuming from multiple queues setting each queue to the same prefetch count will give you a fair distribution of work to that consumer.
What I finally took the time to try this week was changing the prefetch counts based on priority. In my case we had 2 queues, high and low priority. The higher priority was based on user actions and we wanted to happen quickly. There was only 1 set of processes consuming from both queues and had the same prefetch counts. Since the messages are sent to the consumer ahead of time there were 20 messages for each process. Adjusting the low priority queue to a prefetch of 2 meant that there would be 12 items sent to the consumer, still plenty of work. These 12 items are put into a single queue in the library, no work needed in your code, and will give a 5/1 distribution of work in the consumer.
With the adjusted prefetch counts we are able to control which portion of the work we wind up doing when queues start to backup. In this case you have to sacrifice latency to do it, the higher priority queue may give more work to a busy consumer when others could be empty. In practice for us this did not matter, we set the prefetch on the high priority queue to 10 anyway.
This has the nice property that low priority items are still processed while high priority items exist and will be consumed at the highest rate as soon as the high priority items are drained. With more than 2 queues this technique may be cause more latency than you would like but it has be working well and required no code changes. I was planning on making a locking mechanism, and if you didn't want any low priority work in progress while there was high priority work you would still need to, but I don't think one will be needed anytime soon.
Conference Going
Posted onI just returned from a week of conferences, first Monitorama and then Emerging Technologies for the Enterprise.
This was the first Monitorama event, held in Boston, and was a great chance to meet the people behind a lot of the software/blogs I follow. The first day was a single-track set of talks regarding open source monitoring and the second day a hackathon to help improve the state of open source monitoring. I contributed a bit to correct a small pain point I had. I didn't enter it into the judging partially because I believed it to be a rather simple hack and partially because I didn't want to have to rush to get back to Amtrak for my train back to NY. I was pleasantly surprised to see food always available including plenty of healthy bits.
PhillyETE was definitely a big change from Monitorama, more people, more talks, not as great of food. Part of the benefit for me to go to PhillyETE is the trip to Philadelphia to see my family, especially as an Easter trip. The best part of the conference had to be seeing the push for Clojure as an enterprise language, (and slightly less interest to me, Scala). Given that they are JVM languages they fit in very well and can work side by side for evaluation. I tried Scala for a bit since I wanted to try out Akka but ran into JVM memory issues during the Play "Hello, World!" tutorial which really soured me towards Scala.
Basho's sponsorship of Monitorama also helped convince me (with a 25% discount) to attend Ricon East. That may be the end of my conference going this year, I haven't decided yet about Surge.
Graphite Pager - v0.0.6 - Links to Documentation
Posted onI've released version v0.0.6 of Graphite Pager my tool for alerting based on Graphite metrics.
The change for this release was to add links to documentation for each alert.
Currently the format of the URL is {docs_url}/{alert name}#{alert legend name}
where the docs_url is specified in the YAML config and the rest is based on
the alert that is triggering.
While people at work haven't jumped to create metrics and alerts for various things this will at least make it easier for them to know why this alert was created and how to fix the problem. Right now I have only documented a few alerts and will do so as existing alerts fire. If anyone needs alerts made I will make sure the wiki page exists ahead of time.
Provisioning AMQP
Posted onAMQP clients will allow you to declare your exchanges, queues, and bindings at
the consumer level but that can cause problems as you use it more. You may get
to the point that you will have to grep for all the declare methods in your
code or run into problems trying to migrate to a new broker.
An alternative is to have consumers and producers take only the name of a queue or exchange and handle the rest outside of the application. This allows you to see and change in one place the configuration for all of your applications. When you need to provision a new broker it is done in a few seconds instead having to migrate some consumers, then all producers, then the rest of the consumers.
I've started writing and using Declare AMQP so that I can provision everything within Chef. It only supports the features I'm using but is very simple.
The migration is now much simpler as provisioning the server once is enough to make it ready for all applications. When I need to change exchanges or bindings I don't have to update any code. There is still the need to know which applications publish which routing key, but not a huge concern.
This has helped out as well configuring queues with specific priorities for the same type of tasks. Each application can be started with a queue to listen to and the configuration for both the broker and applications remains in one place.
Prioritizing Emails with RabbitMQ
Posted onAfter you move a few tasks to the background with RabbitMQ you may realize that you eventually need to support different priorities for the same type of tasks, sending bulk email after you send transactional email. RabbitMQ doesn't have priorities so you wind up having to use separate queues for each priority.
You should already have a worker that can send the email, just now you need setup RabbitMQ with priorities.
The main exchange you use, email, should be declared either topic or direct
and will take all of the messages you intend to send but when declared you
should include an alternate exchange of
email-undeliverable that is declared as a fanout exchange. Now you just
need a default queue bound to the default routing key for the email
exchange and also bound to email-undeliverable. Now every email your try
to send that doesn't have a specifically prioritized queue will be routed
to the default queue.
All you need now is to start your workers consuming from each queue you create.
Example Tornado AMQP Client with Pika
Posted onI've used AMQP for a couple of years now but never used Pika in production. Recently I've been using Haigha in my AMQP Dispatcher project but needed a client for Tornado, which Pika supports. There is an example in the Pika docs of using the Tornado Connection but it doesn't provide as usable an interface as I'd like.
I wrote an client for internal use that handles the conditions I needed by default (including callbacks with the result of RabbitMQ publish confirmations) and after talking with a previous coworker put it into a gist.
It doesn't handle some things (like publish a content type with the encoded json) and could have some better names but it may be of use to more people.
MongoDB Lock Percentage in Graphite
Posted onWhile investigating our MongoDB lock ratio I was asking around to see what common lock percentages were among those who I know use MongoDB. I discovered that despite having similar setups to what we are using that they didn't know how to get the lock percentage from Graphite.
Using Diamond you can easily get all
of the MongoDB server
status metrics into
Graphite but the globalLock.ratio is a bit misleading in that it is based on
the total uptime of Mongo, which could be a while, and not on recent usage
patterns. And in 2.2 it disappears anyway!
The metrics that are included though that help are globalLock.totalTime and
globalLock.lockTime which can be used to find the lock ratio/percentage over
whatever sampling period you use.
The percentage winds up being
scale(divideSeries(derivative(servers.MONGOHOSTNAME.MongoDBCollector.globalLock.lockTime),derivative(servers.MONGOHOSTNAME.MongoDBCollector.globalLock.totalTime)),100).
You can remove the scale function to get the ratio. This doesn't work with
globbing in Graphite though. You can scale the lockTime though to be able to
get a globbable lock ratio for all of your Mongo servers, the exact value will
depend on the sampling period.
SQL-to-Graphite
Posted onI released a package SQL-to-Graphite that aims to easily save the results of SQL queries into Graphite.
We use this and similar scripts (I'm going to move over to using this) at work
in order to collect global metrics about our systems. I typically count any table
that has a status column and the average/max age of any records that should
be updated periodically.
I made this package once I hit the second repository where I would have to write a script to do this. It should be compatible with any database supported by SQLAlchemy.
After installing (pip install sql-to-graphite) you can run the sql-to-graphite command.
With a file like:
And start getting metrics into Graphite!
Autodetecting Your RSS Feed in the Browser
Posted onI noticed recently that my site didn't have the ![]() icon anymore. I'm
not sure when I lost it but to add it back I just added the
icon anymore. I'm
not sure when I lost it but to add it back I just added the link field that
lets browsers know where my Atom feed is. Simple enough to add <link type="application/atom+xml" rel="alternate" href="/atom.xml"/> to the head
of the page.
Resque Metrics with StatsD
Posted onA recent task of mine was to add some metric collection to a Rails application at SeatGeek. One of the main components (and critical if there was a problem) is the set of Resque background workers. There is actually a Resque Plugin (abandoned, maintained that will collect stats. The gem sadly is not maintained so I forked the maintained repo in order to provide a stable source. I use the commit hash to make sure I get the version but if the repository we used disappears that would cause problems, so a fork solves that.My fork doesn't change much except for some of the paths used for the metrics. At some point I may clean up the README and package my first gem.
Tagging in Jekyll
Posted onCategories in Jekyll have annoyed me for a while because of the URLs generated.
The path would be something like /tag1/tag2/year/month/day/title which works
so long as you don't change the categories used. Since tags are also an option
and don't have the same issue I've switched. I followed this post about
tagging archive pages in Jekyll that
made it rather painless.
Graphing Influence
Posted onI just pushed a Python package for Klout-to-Graphite that will easily allow you to graph your Klout within Graphite.
This started with a few minutes after lunch at SeatGeek where we were checking various Klout scores. Since I tend to graph... everything... I quickly setup a cron script to start collecting the metrics for Graphite.
To run it:
Ideally this is run in cron, we use 30 minutes. Over the course of 2 weeks there is already a few rank changes and large jumps due to adding new social networks to Klout.

Monitoring Service Health Check Duration
Posted onA recent metric I've started paying attention to was the duration of the health check for services behind HAProxy. This is reported in the admin interface CSV and can easily be added to your metric systems. This is what a few nodes started doing yesterday:

This service can usually hits the 50ms range for health checks although it started getting much worse. The service is actually written in Tornado although has a few blocking calls that are used. Non-blocking IO should allow the health checks to be very quick to respond as in this case it returns a static response.
The root cause for the problem is that calls to MongoDB in a particular handler were taking longer than before and will hold back other handlers as it is currently a blocking operation. If the HAProxy health checks pass a threshold it will remove the nodes from the pool, a good precaution, although in our case can cause flickering if MongoDB takes longer than expected.
I did receive alerts thanks to alerting of per-service health checks with Graphite Pager.
We are using Diamond at
SeatGeek which easily collects metrics from HAProxy.
Check duration is (by default) stored at
servers.HAPROXY-SERVER.haproxy.BACKEND.HOST-SERVER.check_duration. The metric
we alert on is the moving median for each server regardless of the HAProxy
server
aliasByNode(movingMedian(groupByNode(servers.*.haproxy.*.*.check_duration,3,"averageSeries"),10),0).
Graphite Pager - An Easy Way to Send Alerts From Graphite
Posted onI've started working on a project making it easy to send alerts from Graphite. Previously at AWeber we had this problem as well but used Nagios (not that easy) which wasn't a great experience. Given that PagerDuty can handle the notification part (Yay APIs!) all that was left was reading Graphite's rawData output and triggering an alert.
Right now I'm testing it at SeatGeek running it on Heroku, the example of how to set up Graphite Pager on Heroku is small and straightforward. It has already helped detect a few problems before our other monitoring tools and (eventually) can alert on actual business metrics!
The alert format looks like:
Pretty Simple. It supports globbing with unique alerts for each metric. Graphite Pager can't determine a disappearing host from the glob, maybe in the future, but will set the alert for all metrics returned.
New Job
Posted onFriday August 17th was my last day at AWeber. I've accepted a position at SeatGeek as a Web Engineer.
AWeber was a great opportunity that turned me from a programmer into a developer. I wish everyone there the best of luck.
Now that I've left I'm upset that most of what I worked on there was not open source so I will no longer be able to use the things that I've built. Towards the end of my time there I was trying to put more projects on Github that could have been useful to someone. Hopefully at SeatGeek I will have the change to make some larger contributions!
Kanban What
Posted onDuring Philly Tech Week I gave a talk about Kanban. This was my first time speaking professionally and I have since volunteered to give a talk at Philly Coders
The official blurb for the Kanban talk
When faced with the challenges of managing a growing email marketing software and 40-person development team, AWeber turned to the project management system Kanban. In this presentation with Ethan McCreadie and Philip Cristiano, they shared AWeber's journey into Kanban, how it functions within AWeber's team structure, and the advantages and disadvantages other companies should take into consideration before implementing the system.
Free Shirts (Focus on Quality)
Posted onIf you want someone to wear your shirt (or promote your company through any free merch) then you might as well spend a little more and give away something great! In the case of shirts, I am a huge fan of the companies that give away American Apparel shirts instead of something crappy.
Companies that I've seen give away American Apparel shirts include:
Even when the company is a competitor to my employer (MailChimp), I'm likely to wear the shirt.
Companies that at least make a comfortable shirt without crappy graphics may still be worn after I'm through the American Apparel shirts.
Like in software, even if you are giving away something for free, you should focus on quality.
Twitter Bootstrap
Posted onI've switched over to using Twitter's Bootstrap library. It was about 30 minutes to setup but I'll have to look around for the best way to use set the active tab in the navbar.
Brightcove's Diamond and Contributing to Projects
Posted onI have spent a significant amount of time recently looking into monitoring and metrics collection. At work we have Nagios and Cacti currently and are looking at other options. After setting up Ganglia we decided to give Graphite a try. There is a script to send data from Ganglia to Graphite although the whole system gets to be more complex than I'd like. The chain winds up being: monitored server -> Ganglia -> Ganglia parser -> Graphite.
Looking at the Graphite Tools page I learned about Diamond which can collect metrics using a Python agent and send them directly to Graphite. It has some very useful collectors already and the big benefit, makes it very easy to add a new collector!
In about an hour I was able to make a collector for MongoDB and submit a pull request. The changeset was accepted making it my first contribution to an existing open-source project! I plan on creating more collectors for software that we are using as work. Next up is likely to be RabbitMQ.
And if you haven't, try Graphite!
Back to Jekyll
Posted onI've switched back to Jekyll! This time it's hosted on my Linode account. After checking my analytics for my domain while it was hosted with Flavors.me I realized it wasn't worth $20 a year for as few hits it was getting when I was paying for this server. It did serve as a good place for recruiters to contact me. We'll see if that still happens here.
vimrc Updates
Posted onI've kept my VIM/dot files online for a while in my Github but I recently spent some time to update my .vimrc file.
One of the changes that bugged me on OSX is that it ships with VIM 7.2 which doesn't have ColorColumn support. I like highlighting the 80th column in Python. As I discovered, the code to do this is :
{% highlight vim %} if version >= 730 autocmd FileType python set cc=80 hi ColorColumn ctermbg=darkgrey guibg=darkgrey endif {% endhighlight %}
Another change was to add Gundo support. This adds a window to navigate your undo tree, an incredibly useful feature.
Branch Coverage with Nose
Posted onSince I heard about the addition of branch coverage tracking for Coverage I've wanted to give it a try. Originally it required a beta release which somehow I never got working.
Once it was in a normal release I somehow forgot about it. There is still no commandline argument to turn it on when using Nose. You can however use the .coveragerc file to enable it.
In .coveragerc simply put
{% highlight bash %} [run] branch = True {% endhighlight %}
And next time you run Nose with coverage you'll have branch coverage too! I was finally reminded about this when coming across the Test Coverage Analysis post by Kai Lautaportti.
Post Categories
Posted onI've added categories to posts although you can't really see them on each page due to an annoying quirk with Jekyll where you can't get the category for a post unless you are listing all of the posts.
Github also doesn't seem to load the pluging properly...
Code Reviews with Git
Posted onA few weeks ago at work we improved our code review process by using Git more effectively. Previously a code review happened after the topic branch was merged into master. This obviously was not very effective as changes could have broken master without a proper review and there was less incentive to perform as careful of a review since the code was "working" already. This was carried over from when we were using SVN until we realized we were no longer forced to work in the dark ages.
Since we were already using Git we could easily change our workflow for a better review process. Once a topic branch was ready for review we could push a remote branch. Our remote branches take the form /review/{initials}/{topic}
To push a new remote branch:
{% highlight bash %} git push origin {branch name}:/review/{initials}/{branch name} {% endhighlight %}
And then we would move the Kanban card to the review column and find someone to review our changes.
When the code has been reviewed and any necessary changes made the reviewer will merge them into master.
{% highlight bash %} git checkout master git merge --no-ff --no-commit /review/{initials}/{branch name} git commit -s {% endhighlight %}
The merge command turns off fast-forward merging and commiting so when we commit with a -s we can sign-off on the changes. This shows who reviewed the code. We don't permit anyone to push their own changes without review although Git doesn't prevent you from changing the committer or the sign-off.
Then finally remove the remote branch by pushing an empty branch over it and delete your local copy of the branch.
{% highlight bash %} git push origin :/review/{initials}/{branch name} git branch -d /review/{initials}/{branch name} {% endhighlight %}
Plug v0.1.2 Bug Fixes
Posted onThis release fixes a bug cause by linking all plug service instances to the installed plug. Runit uses a ./supervise in the service's directory to maintain state which would be clobbered when multiple services link to the same plug.
Now the virtualenv is copied to /srv/plug/plug_instances/ and linked into runit.
There is also a fix for uninstalling plugs leaving orphaned processes. Now Plug will stop the processes before removing them to prevent this.
Plug v0.1.1
Posted onRelease v0.1.1 adds an uninstall command to Plug that takes a --plug=
option and removes the virtualenv and all runit links.
You can get Plug on PyPi and try it out. As always, report any issues.
TestHTTPServer v0.1.2 - Beta Status!
Posted onRelease v0.1.2 includes the ability to set custom response headers and the __version__ package attribute! This release should be "complete" for my own needs and for common uses. If you see anything you need open an issue and I can probably get it updated and packaged in a day or so.
After I use the package a bit more I will bump the version and switch it to production status.
TestHTTPServer v0.1.1
Posted onI've push v0.1.1 of TestHTTPServer. This release adds the ability to handle any method as well as storing request headers and content for all methods.
For v0.1.2 I should be adding more to the server reponse options.
Google Music
Posted onI've been using Google Music quite a bit lately. It was rather painless to setup although the upload process can take a while. The service works out well with my Macbook Air since I only have a 64GB SSD and don't want to fill my drive with music I may or may not be listening to very frequently.
The only issue for me is that the Flash performance can frequently cause studdering if I am doing too much in Chrome at the same time.
Plug v0.1.0
Posted onI've pushed the first version of Plug. You can download it with pip
pip install plugThis is mostly to help me manually test Plug by using it in a few of my own projects and getting together a list of glaring issues.
TestHTTPServer v0.1.0
Posted onI've pushed a new PyPi package TestHTTPServer based on some work at AWeber where I needed to test processes that make web requests.
This probably shouldn't be used right away as it was from memory that I created the package. It will be expanded to record more of the request data and handle more requests.
Packaging
Posted onRoughly 2 weeks ago I started Plug which aims to create a package format for Python daemons. The project started after seeing how Supervisor handles 150+ processes.
A current project at work can easily have many daemon processes with differing number of running instances that may need to be adjusted frequently. Deploying with Supervisor can be a problem given the amount of time Supervisor would take to start/stop processes.
Plug installs each package into a virtualenv then uses runit to manage each daemon instance.
I have a prototype version working now with a packaged version to come in the next few weeks after giving it more testing.
The biggest issue is after watching To Package or Not to Package I am falling in more of the "to package" crowd and despite Plug being a packaging solution smells a bit too much of NIH.
Worker Process
Posted onPart of a current project at work involves writing many stand-alone processes to handle events from RabbitMQ. The worker processes are managed by Supervisor but should gracefully handle SIGTERM and generally follow a common pattern.
The main design is splitting out how worker's should run from what they are supposed to be doing. Extending the BaseWorker class will give a main classmethod used to start new workers.
The BaseWorker class is split from the WorkerRunner class giving a common interface for all workers and Unixy interaction.
You can take a look at what I have so far on the projects page.
Python TDD with Dingus - A Markdown Function
Posted onHere is a walk through for testing a simple function that will convert a directory of markdown files to a directory of HTML files
It should take 2 paths, the source directory and the output directory.
Acceptance Test
In acceptance tests you will want to test as large a feature as possible. The test in this case will assert that a file in the src directory is converted to HTML in the output directory.
Since we want this to create the files on disk we will need to import os.path for some helper functions.
{% highlight python %} import os.path {% endhighlight %}
Then we import the function we plan on testing.
{% highlight python %} from markdown_processor import process_markdown {% endhighlight %}
From there we can begin by creating the test class that will handle all of our setup and our assertion.
{% highlight python %} class WhenRunningProcessor(object):
    @classmethod
    def setup_class(cls):
        cls.src_dir = 'src_example'
        cls.target_dir = 'target_dir'

        process_markdown(cls.src_dir, cls.target_dir)
{% endhighlight %}
This creates a class WhenRunningProcessor That inherits from object. Before each test case Nose allows us to run code to setup the test. In this case we use the @classmethod decorator and setup_class. This function will be run once before all tests in this class. Acceptance tests will take longer to run then unit tests and usually do not require the same level of isolation.
Then we define the src_dir and target_dir since we will be using them a few times.
Finally we run the function we plan on testing passing in the src_dir and target_dir.
Now we can write the acceptance test for this function
{% highlight python %} def should_have_html_hello_world(self): file_path = os.path.join(self.target_dir, 'hello_world.html') content = open(file_path, 'r').read() assert '
Hello World!
' in content {% endhighlight %}Our test is checking that the text '<p>Hello World!</p>' is in a file in the output directory. This requires some fixture data in the source directory which is only
Hello World!The file_path is the our target_dir folder and the hello_world.html file. The file is read and then an assertion checking that the test exists.
The whole test file will look like this:
{% highlight python %} import os.path
from markdown_processor import process_markdown

class WhenRunningProcessor(object):

    @classmethod
    def setup_class(cls):
        cls.src_dir = 'src_example'
        cls.target_dir = 'target_dir'

        process_markdown(cls.src_dir, cls.target_dir)

    def should_have_html_hello_world(self):
        file_path = os.path.join(self.target_dir, 'hello_world.html')
        content = open(file_path, 'r').read()
        assert '<p>Hello World!</p>' in content
{% endhighlight %}
Unit Tests
In our unit tests we will test how we plan to implement this functionality. The mocking library Dingus will allow us to isolate the our function from the OS and our other libraries. After the function is run we can test to make sure the code works how we expected it to.
First will will import everything we need for the test
{% highlight python %} from dingus import Dingus, DingusTestCase
from markdown_processor import process_markdown
import markdown_processor as mod
{% endhighlight %}
The dingus library provides us with a Dingus class which we will use to assert what our function is doing and the DingusTestCase will automatically isolate our function.
As well as the function we want to test we also import the module to help us make assertions about what goes on outside the function.
Now we can setup a base class to use for our tests. This will hold the common elements we use for our tests.
{% highlight python %} class BaseProcessing(DingusTestCase(process_markdown)):
    def setup(self):
        super(BaseProcessing, self).setup()
        self.src_dir = Dingus('src_dir')
        self.target_dir = Dingus('target_dir')

        mod.os.listdir.return_value = ['hello_world.markdown']
        mod.os.path.splitext.return_value = ('hello_world', 'markdown')

        self.md = mod.markdown.Markdown()
{% endhighlight %}
Our BaseProcessing class inherits from DingusTestCase while passing in our function. This will isolate our function and replace everything around it with Dingus objects. The setup method will be run before each test, unlike the acceptance tests where setup_class was only run once. We once again setup our src_dir and target_dir but this time use Dingus objects while passing in a helpful name. In this case the strings for our directories shouldn't be modified but this allows you to verify any operations performed on the arguments.
Next we set the return values of some function we plan on using. Remember everything but our function is a Dingus which only return a new Dingus when called. The listdir function will return a list of entries in the directory. In this case we just want to return a list with 1 file. We will need to get the filename without an extension so we will set the return_value to be a tuple of the name and extension.
The last part is setting a shorter name for the Markdown instance.
Test Cases
Of first test is to assert that we see if the target directory exists.
{% highlight python %} def should_check_existance_of_target_dir(self): assert mod.os.path.calls('exists', self.target_dir) {% endhighlight %}
We will use os.path.exists to check. The assert uses the .calls method to see if os.path.exists was called with our target directory.
Next will want to assert that a markdown instance is created
{% highlight python %} def should_create_markdown_instance(self): assert mod.markdown.calls( 'Markdown', extensions=['codehilite'] ).once() {% endhighlight %}
This time we check that the object is called with the extension 'codehilite' and that it is only called once.
Now we need to get the files we plan on converting so we will use the os.listdir that uses our mocked return value.
{% highlight python %} def should_find_markdown_files(self): assert mod.os.calls('listdir', self.src_dir) {% endhighlight %}
Finally we can test that our file is actually converted by markdown
{% highlight python %} def should_join_source(self): assert mod.os.path.calls('join', self.src_dir, 'hello_world.markdown')
def should_join_target(self):
    assert mod.os.path.calls('join', self.target_dir, 'hello_world.html')

def should_convert_files(self):
    in_file = mod.os.path.join()
    out_file = mod.os.path.join()
    assert self.md.calls('convertFile', in_file, out_file)
{% endhighlight %}
We first assert that our function properly creates the paths to use for the input and output files then calls markdown's convertFile function. The in_file and out_file are actually the same dingus in this case, the join() will return an object we can use to test with.
Now that the tests are written we can add the classes to run them.
{% highlight python %} class WhenProcessingMarkdown(BaseProcessing):
    def setup(self):
        BaseProcessing.setup(self)
        mod.os.path.exists.return_value = False
        process_markdown(self.src_dir, self.target_dir)

    def should_create_target_directory(self):
        assert mod.os.calls('mkdir', self.target_dir)
{% endhighlight %}
WhenProcessingMarkdown inherits from our BaseProcessing class including all of the test cases. In our setup this time we want to make sure we run BaseProcessing.setup with our instance and set the return value of os.path.exists. After that we run our function.
Since our output directory doesn't exist in this test it will want to make sure that we try to create it.
Because we need to test the other case where the directory already exists we create a new test class where that is true.
{% highlight python %} class WhenProcessingMarkdownAndDirectoryExists(BaseProcessing):
    def setup(self):
        BaseProcessing.setup(self)
        mod.os.path.exists.return_value = True
        process_markdown(self.src_dir, self.target_dir)

    def should_not_create_target_directory(self):
        assert not mod.os.calls('mkdir')
{% endhighlight %}
This is very similar except that the exists() return value is True so we will want to assert that we do not call mkdir at all.
Implementation
Our tests are complete and we can move on to our implementation.
{% highlight python %} import os
import markdown

def process_markdown(src_dir, target_dir):
    "Converts files from :param src_dir: to html in the :param target_dir:"
    if not os.path.exists(target_dir):
        os.mkdir(target_dir)

    md = markdown.Markdown(extensions=['codehilite'])

    for file in os.listdir(src_dir):
        name, ext = os.path.splitext(file)

        in_file = os.path.join(src_dir, file)
        out_file = os.path.join(target_dir, name + '.html')
        md.convertFile(in_file, out_file)
{% endhighlight %}
The implementation shouldn't be surprising after planning it out. Our function takes 2 arguments, possibly creates the target directory, then converts each file from our source directory.
You can download the full source
Test Sizes
Posted onAt AWeber we tend to write tests. A lot of them. I spend more time writing tests then features. My belief is that if a line of code isn't tested it wasn't important enough to write in the first place. You won't know when it breaks and now you're delivering broken software.
Testing isn't covered much in school. If your projects are only 2 weeks long and disappear after you've handed them in, testing doesn't prove it's worth. When tests are mentioned it's never anything practical, never how to test certain features, what parts are even worth testing?
My current project has 3 sets of tests, unit, integration, and acceptance tests. Google has small, medium, and large tests which roughly correspond to what we write.
Acceptance Tests
These are written first to tell us what we want from a feature. Usually these are structure as interaction stories of the Cucumber variety.
{% highlight bash %}
When a customer has a list of subscribers
And sends a message to the list
The subscribers receive the message
{% endhighlight %}
A common example, definitely a feature you want working. The tests are a little more complicated than that, including assertions to make sure certain steps execute as anticipated.
Integration tests
Integration tests started as a need to test various states of our database and queuing systems. They generally involve testing components to make sure they behave when everything isn't perfect.
What happens when a worker dies in the middle of a job?
Can another worker pick up the job immediately or does it require human intervention?
These stories enumerate the states our models can occupy. When an event comes in from the queue it may be the first, a duplicate, or a re-fired event from a failed worker. A simplified case for sending an email that can be either :
{% highlight bash %}
New
Trying to send
Sending
Sent
{% endhighlight %}
Our tests classes would cover the cases:
{% highlight bash %}
When sending a new email
When sending an email that is trying to send
When sending an email that is sending
When sending a sent email
{% endhighlight %}
Once we have the tests we can figure out which states are possible to recover from. These cases are much more difficult to cover in acceptance tests. They would require excessive test setup and extensive knowledge of our system.
Unit tests
We write unit tests to verify our implementation. This means mocking out as much as possible and isolating individual objects and functions. We use Dingus as our mocking library. At this point the feature is well defined and important test cases are covered, we can focus on how we want to solve them.
{% highlight bash %}
When sending an email
If email is New
Generate and send an email

When sending an email
If email is Trying to send, Sending, or Sent
Do not try and send the email
{% endhighlight %}
With tests of each size we gain greater confidence that our code is working and you can use them in a month when you forget how or why things were done this way.